
The Original Cordsmith®
Cordsmith Mini®, Cordsmith XL®, Cordsmith Tailor® and Cordsmith Fine Tailor®
$25.00 for one, $20 each when buying two or more – feel free to mix and match between sizes and colors! If ordering 12 or more please email me for wholesale pricing – you do not need to be a yarn store to qualify.
Looking to order YOUR personalized Cordsmith®? You can do that here.
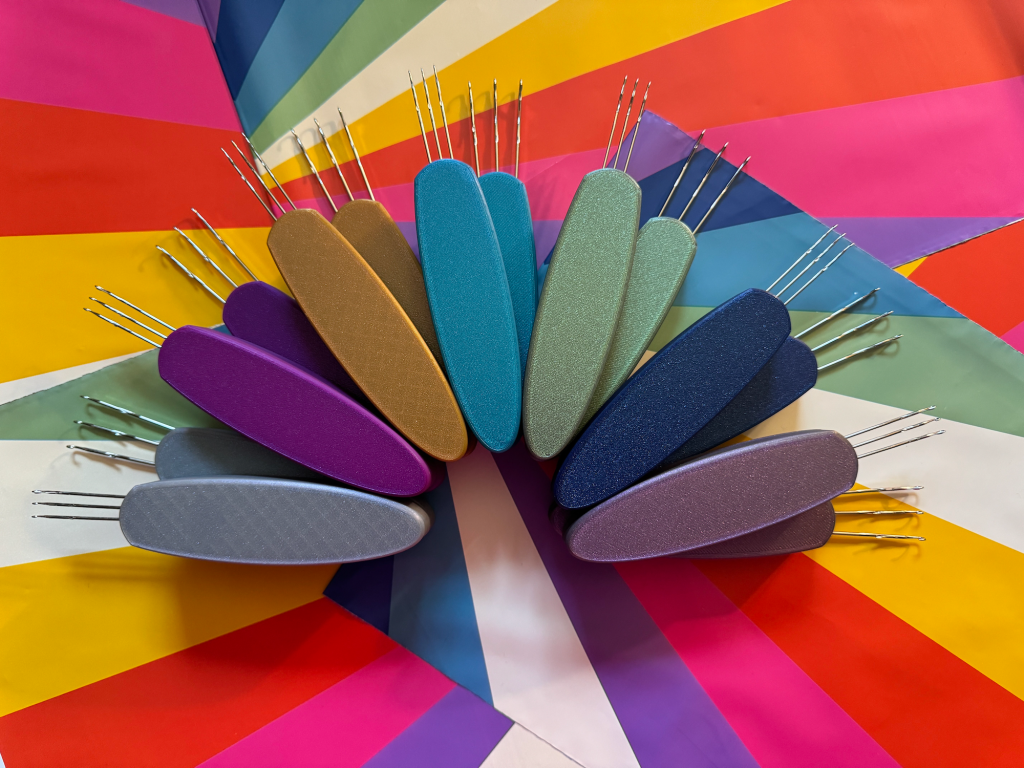
Designed by a maker, for makers. The handle is made from 3D printed plastic available in over 40 color and design options. With 3 stainless steel latch needles in the Mini and Original, 4 in the XL, 1 in Tailor and Fine Tailor, and has been designed to be comfortable to hold for long periods of time. It has a lightly textured surface so it’s easy to grip.
Autumn will be in touch with your total, including shipping, as well as payment options. She typically responds within 24 hours so if you haven’t heard from her, be sure to check your spam/junk folders!
Do we ship outside the US?
Of course! And we’ve got a handy table of costs so you can get an estimate on how much it might be to get a Cordsmith® shipped to your country.

A bespoke tool for creating knitted cord.
Designed by a maker, for makers.
I don’t know about you, but while I love the way i-cord looks, I really dislike knitting it. So, I decided to see if I could design a tool to make the process more enjoyable, and faster too.
Enter, the Cordsmith®. This simple tool allows you to create a row of i-cord with a single movement, replacing three knit stitches and the time it takes to slide your stitches back to your working needle again.
Yes, it really is that fast and it’s easy enough that kids can use it too!

Frequently asked questions

Did you design the Cordsmith®?
Yes! I took the idea and my fiber arts knowledge and worked with my husband and his 3D design skills to create Cordsmith®. Over multiple iterations I finally landed on a version that was functional and accessible.

Is the Cordsmith® tool accessible?
It’s lightweight, designed to be able to be used left or right handed, has a texture on both sides that makes it easy to hold onto and is sized that small hands can grip it firming while hands with dexterity issues or conditions like arthritis can grasp and worked with a relaxed hand. It actually works better if you’re relaxed which means you can work longer without fatigue. The Original Cordsmith® and Cordsmith Mini® have identical handles and the needle lengths are about the same so switching between them will feel natural.

Can I buy a Cordsmith™?
Yes! One Cordsmith® is $25 and there is an automatic discount of 20% when purchasing two or more shipping to the same address which brings the price down to $20 each. You are welcome to mix and match The Original Cordsmith®, Cordsmith Mini®, Cordsmith XL®, Cordsmith Tailor® and Cordsmith Fine Tailor® when ordering.
Shipping within the US is $5 for up to 4 tools and to Canada is $16.45 for up to 4 tools. You can find a list of stockists here.

What is the lead time?
We are currently fulfilling individual orders within a 1-3 business days and customized wholesale orders within 5-10 business days. When you contact me to order, I provide when your order is expected to ship and will let you know right away if there is a delay but we are always shooting for early!

Is the Cordsmith® legit?
Very much so! I posted a 30 second clip of Cordsmith® in use on 11/7/23 and received my first orders within 5 minutes and haven’t slowed down since!
We are currently at over 26,000 units sold which have shipped to over 40 countries!

Are there more sizes?
Yes! The Original Cordsmith® is designed to be ‘one size fits most’! I’ve personally tested it with fingering weight up to bulky and I’m seeing others using chunky yarn like Rasta or Mecha with no problem! The fiber content and twist of the yarn will make some of the heavier weight yarns easier to work with than others so feel free to experiment. I’ve easily used my Original with a superwash bulky but have seen some struggle with single ply non-superwash bulky. Some people are even using fingering weight to make an i-cord and then using that to make a bulky weight i-cord.
Cordsmith Mini® uses smaller needles and spacing and is intended for yarn weights lace up to sport and creates a cord about the gauge of bulky weight yarn. The process for using them is the same! You can see a comparison of the different sizes with different yarns here on TikTok.
Cordsmith XL® uses 4 Original needles with slightly narrower spacing that works with lace weight up to DK and creates a thicker cord than the Original that is slightly flat directly off of the tool but can be squished into a rounder profile.
Cordsmith Tailor® (Original size needle) and Fine Tailor® (Mini size) are single needle tools perfect for weaving in ends – including those too short tails that you can’t thread onto a tapestry needle. Use them for seaming, three needle bind offs, installing zippers and more! These use the same handles you already know and love and are ideal for people who struggle with tapestry needles! While The Original Cordsmith® is the “one size fits all” of our cord making tools, Fine Tailor® will likely be the tool you reach for most for weaving in ends. Tailor works great for heavier weight yarns and projects while Fine Tailor® will be best for lighter weights.
How do you cast on?
Create a slip knot and wrap it around the right needle, under the middle needle, and around the left needle. Tighten the knot and then, after making sure all of the needles are open, wrap your yarn across all three needles. Holding onto the tail of the slip knot pull forward, up and over the needles. Pull back towards the handle to complete your stitch and it will reopen your needles. Pull back up towards the middle below the open needles to start your next stitch. Repeat until you have the number of stitches you need. You can watch a video here on Instagram or here on TikTok. For Cordsmith XL™ use the same process ignoring one of the end needles and when you wrap your yarn you’ll wrap across all 4 needles and complete the stitch as above. Repeat until you have the number of stitches or length needed.
How do you change colors?
Grab your new color and, leaving a little bit of a tail, yarn over and start your next stitch. You can hold the new tail and old tail together with your cord to make it easier for the first stitch to add stability. When you’re finished with the cord or have a couple of inches down, twist the tails once so the colors point at their sections and weave them back into the middle of their matching color sections of cord. You can watch a video here on Instagram or here on TikTok.

How do you pick up dropped stitches?
Stitches popping off is usually due to trying to work too fast. It’s easiest if you pull the stitches back a round or two so your yarn is back at the “starting position” stitch and then picking the stitches back up to keep working. For me, since I’m right handed and I like to wrap clockwise, my starting stitch is the one on the right. For Cordsmith Mini®, you might find it helpful to have a crochet hook or tapestry needle handy to help pick up stitches due to the smaller needles and spacing. You can watch a video about picking up stitches here.
How do you do an applied I-cord bind off?
Pick up the first three stitches of the i-cord bind off – one per needle – and work the stitch with Cordsmith® and then you’ll pick up your next stitch on your left needle to work the next stitch repeating down the edge until you’ve bound off all stitches. Another option is to start the cord on your Cordsmith® with a couple of stitches and then start picking up your stitches as described above. This allows you to create a straight point. While both the Original Cordsmith® and Cordsmith Mini® work for i-cord bind offs, you may prefer Cordsmith Mini® for lace/fingering/sport projects to provide a tighter gauge and sleeker finish. You can watch a video here.

Is my Cordsmith® broken?
A visible seam is normal due to the way our tool is printed and assembled since the handle is printed in two parts. Needles that seem wiggly or loose are also normal! That little bit of wiggle allows for flexibility which makes your stitches easier to work while also providing strain relief so your needles are less likely to break. If you have a handle that has actually fallen apart or a needle that has broken, please reach out with photos and I’ll arrange for a replacement right away.

What can the Cordsmith® be used for?
Anything that requires knitted cord!
- Use it to create i-cord to cast on a project – it works especially well for crochet in place of a traditional chain cast on!
- Use it to create an attached i-cord bind off
- Drawstrings for hoodies, pants, and bags
- Lanyards for keys and ID/work badges
- Use the i-cord to knit or crochet a super squishy blanket, rugs or chair cushions
- Add beads as you go to make sparkly bracelets or holiday garland
- Wrap around round foam balls to make holiday decorations
- Hanging loops for stockings
- Knotted clasps for cardigans
- Loops and ties for sewn dresses and tops or add texture to quilt tops
- Slide over wire shapes and words
- Bag straps and zipper pulls
- Macramé art and plant hangers
- Weaving and decorative wall hangings
- Strings to attach mittens or hat ties
- Bows for hair and barrettes

Any other tips and tricks?
Be patient! The first stitch or three can be a little finicky so don’t give up! I recommend using a yarn with a little bit of stretch to start and a heavier weight like DK or worsted for the Original and fingering for the Mini. Cotton or linen aren’t as easy for beginners, due to the lack of stretch, but can be used with practice. Novelty yarns like boucle, fur, or feathers are definitely are not beginner friendly. Slub yarn can be used with the Original but the slubs are too big for the Mini. When you’re working, keep your working yarn loose and it will be easier to pull your stitches up and over. Once you’ve got a few stitches you’ll have more of the cord to grab which makes things easier! Since you have the cord to hold you’ll find that you won’t have issues with twisting or with needing weights to keep your tension consistent unlike traditional i-cord machines. With a little practice and patience you’ll be zooming along in no time!
Safety!
Though Cordsmith® is designed to be used by users of most ages, practical precautions are recommended which is why we state that it is for users 18+. The needles have sharp tips, so, as with any other sharp object, use caution and keep away from young children. While children can learn to use Cordsmith, constant adult supervision is recommended at all times. When not in use consider storing your Cordsmith(s)® in our Cordsmith® pouch or some other type of zippered pouch that isn’t easily punctured. Crafting should be fun but safety first! If your tool ever cracks or is broken, please send me a picture here with a note about what happened and I will ensure a replacement is sent to you at no charge.
Murmur beads may be a choking hazard for small children! Keep away from children under 3.
⚠ WARNING: This product contains embedded sharp metal components. Keep away from children under 3 years old.
⚠ WARNING: For adult use only. Recommended age: 18+
⚠ WARNING: Risk of injury if product is damaged. Do not use if cracked or broken.
⚠ WARNING: This product is not a toy. Use only as intended.
⚠ WARNING: Keep away from open flames and high heat sources. PLA can begin to soften or warp at around 131-140° and cars easily reach 140-176° on a hot sunny day.
⚠ WARNING: Contains small embedded parts – not suitable for unsupervised minors.
Thank you!
Each Cordsmith® is made for you by hand in Ohio. Your enthusiasm for Cordsmith® and support of our family means everything! Thank you for supporting this small, woman-owned, family-run business.
What people are saying
“I can’t wait to whip up miles of I Cord.” — @indigo.knits
“I just got my Cordsmith this weekend and I don’t know how I have lived life without it!” — @crochetennoir
“My Cordsmith came today and holy cow this is an addictive gadget!” — @arielmakesstuff
“It’s super stretchy and looking perfect on take two. Immediately in love with the Cordsmith” — @procrasticrafting
“I might be obsessed.” — @fleurangeapparel
“Literally unpacked this Cordsmith from the mail 5 minutes ago and am already i-cording away. This is such a neat idea!” — @s2five
“We have been proud stockists of the Cordsmith for a while now and I can’t tell you how amazing a product it is – it is addictive! The product is so well made and sturdy. Autumn is a wonderful person with the best customer service, nothing is ever a trouble. We have our logo on our Cordsmiths in our own signature colour palette and they fly out the door in the shop! Highly recommend. – Lisa @fortheloveofyarn
“The #cordsmith is 100% legit and is amazing. This has made I-cord fun to do!” — @gypsyyarns
“My Cordsmith arrived and I had to test it out immediately!!! Such a cool tool!” — @perfectlyknotted
“Had to test it out right away, first with a fingering weight and then with a lace weight, just as an experiment (probably won’t ever use it on that weight. Pretty nifty!” — @obaknits
“Set up took some getting used to but holy crap when you get going it FLIES 10/10 recommend!” — @vicknitsnstuff
“As someone who super struggled with knitting icords no matter how much I practiced, this tool has been one of my favorite purchases this year 🖤” — @gothgrandma27
“The tool arrived yesterday and it’s amazing! My only regret is that I now want to spend the entire day obsessively making I-cord. 🤣” — Donna
“I love my cordsmith! This is definitely a new addiction 😆” — Sara
